Sunday, March 28, 2010

Trip to Borobudur

March 2010, this month the first group ride of our cycling club was realized,
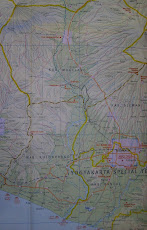
we went to Jogjakarta and cycling to Borobudur.
There were 14 of us participated in this ride, including 2 ladies.

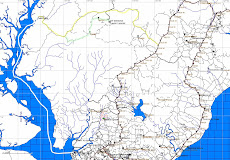
We chose an easy route out of main traffic, and not too many climb neither.
In this trip we cycled for 46km in about 4 hours including some stops.


The participants were devided into 2 groups,
first group arrived in Jogja on 12 March,
and the second group arrive on 13 March in the morning.

I was with the second group, there were 8 of us,
taking the first flight of Batavia Air from Balikpapan to Jogja,
departing at 07:15.
Our bike was packed and registered in our bagages,
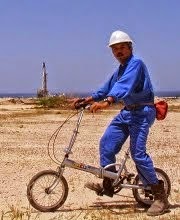
6 of us brought folding bikes, and the 2 others brought their MTBs.
The plane arrived on time at Jogja, and after recovering the baggages,
we started to re-assemble our bikes at the airport corridor !!


We left the airport on our bikes at 09:00,
cars from our hotel bringing our bags and other bagages.
Those cars were also escorting us, following our group,
all the way to Borobudur.

We rode from Jogja airport for about 8km downtown,
and met the first group at their hotel at 09:30.
Shortly after re-start from hotel we left the main road,
and following a canal known by the local as "Selokan Mataram" upstream.
We rode on the relatively smooth and quiet canal path,
with classic Javanesse countryside scenery around,
rice field - farmers - irrigation canal and water stream.


The temperature was rising quickly after 10 o'clock,
and we made some stops to take pictures and regrouping.
Some of us had problems with their bikes,
but they were "usual problems" like flat tire and loosen pedals.
We fixed those problems while others was taking rest,
and at 13:00 we arrived safely in Borobudur.


It was very hot day, and at the end,
none of us willing to cycle back to Jogja.
So after finding a restaurant for lunch,
we just sent our bikes to Jogja on one of our escort car.
Somehow, a small Suzuki pick up was enough for 14 bicycles.....
On the rest of the afternoon we made a tour inside Borobudur temple complex.


We had to find another car to bring us back to Jogja,
and it was not too difficult to find a car around Borobudur.
For 200 thousand rupiah we found extra car.
We arrived at the hotel at 18:00,
we all worn out but we all have big smiles.

Thanks to all participants
for their positive cooperation and team spirits.

Many thanks to Pambudi from Indraloka Guest House,
Jl. Cik di Tiro Jogjakarta, for arranging cars and accommodations.

And also special thanks for Bakhtiar(www.scottmerah.multiply.com),
Qardian, Tonny, Yoga and Alex for sharing pictures and GPS records.

Thursday, March 11, 2010

packing a bike


Here is an old bike that I want to pack, old road bike with 700C wheel set and threaded type headset with quil bolt.
First strip all accessories out of the bike (cyclometer, lighting, bell, fender, bottle cage etc)


We will need multitools with allen key, hex wrench to remove pedals (mine is 15mm), tape and used newspapers.
My old bike has hi-ten steel frame and the paint is not so nice anymore, so I don’t mind if it takes more scratches…
If you have nicer bike with nice paint etc,
then you will need some insulation foams to protect the frame.


First remove the wheel and DEFLATE the tire.
To remove the rear wheel, put the derailleur on the smallest cog position.
If your bike is MTB or equipped with fat tire,
then the brake caliper need to be opened first.


Put the bike upside down, take the pedal out using hex wrench.
With bike in upside down position as in the picture,
we need to push the key down to release the right side pedal.
Remember that left side pedal has left hand thread.


Remove the RD (rear derailleur) too,
to avoid protruding part on the bottom side of the bicycle.


Wrap the RD with used newspaper,
and secure it in between bike’s rear triangle.
To avoid losing the RD nut,
put the RD nut back in its place once the RD has removed.


My bike has quil system,
so by loosen the main nuts I can remove the handlebar and the stem completely.
Bolts that securing bar ends, brakes and shifter need to loosen too,
so they can be rotate and reposition easily later.


Put the handlebar on the bike’s top tube and secure with tape,
if you have a nice paint on the bike frame,
then you need to protect the frame first with insulator foam.
Mine is old beaten bike,
so I just tape those parts together without extra protection.


After attaching handlebar,
attach the wheels to the front triangle,
do it so with the cassette on the inner part.

With this configuration, the dimension is 120x80x35cm,
rear rack and saddle could be removed to save more space.
The fork gap (and also rear triangle) could be protected
by inserting a long nut or wooden spacer.
Use only thick carton to box the bike,
put piece of plywood on the bottom of the carton box to protect chain ring.
We can put our tools in the carton box too,
at minimum we will need pump, multitools, hex wrench,
and some parts like tube patch kit etc.
The nicer your bike is, the more protections you are going to need.

IMPORTANT for carbon/aluminum bike,
the cassette needs to be wrapped with foam/rags/used papers
so it would not chipping the frame.
ALSO for bike with disc brake,
we will need extra protection for the disc too !